Transform Your Art: 6 Essential Tips for Choosing DIY Electronics
Imagine transforming your home with stunning DIY electronics for art projects that light up and interact with your environment.
As a life coach, I’ve guided many retirees through the maze of choosing the right electronic components for art. In my experience, selecting the right tools can significantly enhance creativity and lead to fulfilling, interactive art with electronics experiences.
In this article, you’ll discover practical strategies, benefits, and tools to help you confidently choose DIY electronic art supplies for your creative pursuits. Let’s dive into the world of Arduino for artistic installations and creative circuit projects.
Understanding the Struggles of Choosing DIY Electronics for Art Projects
Many retirees face a daunting challenge when they first dive into DIY electronics for art projects. The sheer variety of components, technical jargon, and uncertainty about where to start can be overwhelming.
It’s common for people to feel lost amidst countless options, unsure which DIY electronic art supplies will best fit their creative vision.
Several clients report feeling stuck before even starting their creative circuit projects. This uncertainty often hinders the creative process.
As a result, many promising ideas for interactive art with electronics are abandoned before they come to fruition.
The impact is significant. Feeling overwhelmed can lead to frustration and discouragement, stifling the joy and satisfaction that come from completing DIY electronics for art projects.
Key Steps to Choosing the Right DIY Electronics for Art Projects
Overcoming this challenge requires a few key steps. Here are the main areas to focus on to make progress with DIY electronics for art projects.
- Assess your skill level and project goals: Understand your current skills and define your project goals for creative circuit projects.
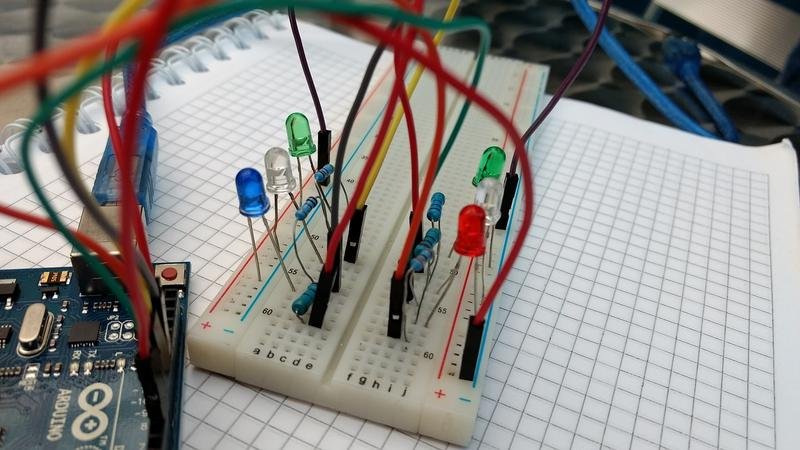
- Research beginner-friendly DIY electronics kits: Look for highly-rated beginner kits like Arduino starter kits for artistic installations.
- Explore microcontrollers like Arduino for versatility: Learn about microcontrollers and start with simple tutorials for microcontroller art projects.
- Consider LED lights for visual impact in art: Explore different types of LEDs and their uses in LED art installations.
- Look into interactive sound devices for installations: Research and try building basic sound-reactive art electronics projects.
- Start with digital templates for guided projects: Use digital templates for step-by-step guidance on DIY electronic art supplies.
Let’s dive into these DIY electronics for art projects!
1: Assess your skill level and project goals
Assessing your skill level and defining your project goals is the first step in choosing the right DIY electronics for art projects and creative pursuits.
Actionable Steps:
- Take a self-assessment questionnaire to gauge your current comfort level with DIY electronic art supplies and components.
- Define clear project goals by visualizing the end product you want to create, such as interactive art with electronics or LED art installations.
- Set realistic expectations based on your skills and the time you have available for creative circuit projects.
Explanation: These steps matter because they help you understand your starting point and set achievable goals for DIY electronics for art projects.
By knowing your skill level, you can select projects that match your abilities, such as Arduino for artistic installations or microcontroller art projects, ensuring a more enjoyable and successful experience.
For example, the Philadelphia School District emphasizes the importance of hands-on learning and critical thinking in creative projects, as seen here.
Starting with a self-assessment helps you build confidence and ensures that your projects, whether they’re wearable tech art projects or kinetic electronic sculptures, align with your capabilities.
2: Research beginner-friendly DIY electronics kits
Finding the right beginner-friendly DIY electronics kits for art projects is crucial for getting started without feeling overwhelmed.
Actionable Steps:
- Search online for highly-rated beginner kits like Arduino starter kits, which offer comprehensive guides for creative circuit projects.
- Read user reviews and watch unboxing videos to understand the kit contents and ease of use for DIY electronic art supplies.
- Join online forums or communities to get recommendations and tips from other beginners who share their experiences with interactive art with electronics.
Key benefits of using beginner-friendly kits:
- Structured learning path for DIY electronics for art projects
- All necessary electronic components for art included
- Detailed instructions and support for microcontroller art projects
Explanation: These steps matter because they help you start with the right tools, easing the learning curve and boosting confidence in creating LED art installations or sound-reactive art electronics.
For instance, exploring popular kits like Arduino can simplify your journey into electronics for artistic installations. Additionally, reading reviews and engaging with communities ensures you make informed decisions about wearable tech art projects.
The Ohio Department of Education highlights the importance of hands-on learning in STEM education, which aligns with this approach to DIY electronics for art projects.
This foundation will empower you to confidently move forward with your DIY electronics for art projects, including kinetic electronic sculptures.

3: Explore microcontrollers like Arduino for versatility
Exploring microcontrollers like Arduino opens up a world of possibilities for your DIY electronics for art projects.
Actionable Steps:
- Start with simple tutorials: Begin with basic Arduino tutorials to build confidence and understand how microcontrollers work for creative circuit projects.
- Experiment with small projects: Create projects like blinking LEDs to get hands-on experience with Arduino and electronic components for art.
- Join online communities: Engage with forums and groups to share your progress and seek advice from experienced users on DIY electronic art supplies.
Explanation: These steps matter because they gradually introduce you to the versatile capabilities of microcontrollers for Arduino for artistic installations.
By starting with simple projects and joining communities, you can learn efficiently and seek support when needed for interactive art with electronics. For example, the Ohio Department of Education highlights the importance of hands-on learning in STEM fields, which aligns with this approach to DIY electronics for art projects.
This foundation will empower you to confidently move forward with your microcontroller art projects.
4: Consider LED lights for visual impact in art
Using LED lights can significantly enhance the visual appeal of your DIY electronics for art projects.
Actionable Steps:
- Explore different types of LED lights: Research various LED options such as strip lights, fairy lights, and individual LEDs to find the best fit for your creative circuit projects.
- Test LED integration on a small scale: Create a simple light-up card or ornament to experiment with incorporating LEDs into your DIY electronic art supplies.
- Plan your larger project: Sketch how you will integrate LEDs into your main art piece for maximum visual impact, considering options like interactive art with electronics.
Explanation: These steps matter because they help you experiment with LED lights on a manageable scale before committing to a larger project.
By testing and planning, you can ensure your final piece is visually striking and aligned with your creative vision for DIY electronics for art projects.
For example, integrating advanced technology like LEDs is a growing trend in K-12 education, as seen here.
Experimenting with LEDs can inspire new ideas and enhance your art projects, potentially leading to LED art installations or sound-reactive art electronics.
5: Look into interactive sound devices for installations
Exploring interactive sound devices can add a dynamic auditory element to your DIY electronics for art projects.
Actionable Steps:
- Research basic sound devices: Start with simple sound modules and read online tutorials to understand their functions in creative circuit projects.
- Build a basic sound project: Follow a tutorial to create a sound device that responds to touch or movement, incorporating DIY electronic art supplies.
- Prototype integration: Test your sound device in a small art piece before scaling it to a larger installation, similar to Arduino for artistic installations.
Popular types of interactive sound devices for DIY electronics for art projects:
- Motion-activated speakers
- Touch-sensitive sound panels
- Proximity-based audio triggers
Explanation: These steps matter because they help you integrate sound in manageable stages, ensuring you’re comfortable with the technology for interactive art with electronics.
For instance, interactive sound projects can enhance the sensory experience of your artwork, making it more engaging, like sound-reactive art electronics.
According to the Ohio Department of Education, incorporating technology in art fosters hands-on learning and creativity.
Adding sound can transform your art, making it more immersive and interactive, much like kinetic electronic sculptures.

6: Start with digital templates for guided projects
Using digital templates can simplify your DIY electronics for art projects journey by providing clear, step-by-step guidance.
Actionable Steps:
- Download free or purchased templates: Choose templates that match your DIY electronic art project goals and skill level.
- Follow the instructions closely: Complete the guided project step-by-step to build confidence and skills in creative circuit projects.
- Customize the project: Add your unique creative touch to the template project for a personalized result using electronic components for art.
Benefits of using digital templates:
- Structured learning process for DIY electronics for art projects
- Reduced risk of errors in interactive art with electronics
- Inspiration for future microcontroller art projects
Explanation: These steps matter because they offer a structured approach, making it easier for you to start and complete DIY electronics for art projects.
By following templates, you can avoid feeling overwhelmed and ensure consistent progress in creative circuit projects. For example, Xreart provides digital templates for creating framed art from disassembled electronics, which can inspire and guide your creativity in DIY electronic art.
Starting with templates helps you build foundational skills and gain confidence in your DIY electronics for art projects, whether you’re working on LED art installations or wearable tech art projects.

Partner with Alleo on Your DIY Electronics Journey
We’ve explored the challenges of choosing DIY electronics for art projects and the steps to overcome them. But did you know you can work with Alleo to make this journey easier and faster?
Setting up an account with Alleo is simple. Start by creating a personalized plan tailored to your goals, whether you’re interested in creative circuit projects or interactive art with electronics.
Alleo’s AI coach provides affordable, tailored coaching support for your DIY electronics projects. The coach offers full coaching sessions, just like a human coach, guiding you through everything from selecting electronic components for art to developing Arduino for artistic installations.
You’ll receive follow-ups on your progress, and the coach will handle changes and keep you accountable via text and push notifications, perfect for those working on LED art installations or sound-reactive art electronics.
Alleo even offers a free 14-day trial, requiring no credit card. Ready to get started for free and explore the world of DIY electronics for art projects?
Let me show you how!
Step 1: Log In or Create Your Account
To begin your DIY electronics journey with Alleo’s AI coach, simply Log in to your account or create a new one to access personalized guidance and support for your creative projects.

Step 2: Choose “Building better habits and routines”
Click on “Building better habits and routines” to focus your DIY electronics journey. This goal will help you establish a consistent practice, making it easier to tackle complex projects and overcome the initial overwhelm of choosing the right tools and components for your creative pursuits.

Step 3: Select “Personal” as Your Focus Area
Choose “Personal” as your life area to explore DIY electronics for creative art projects, allowing you to enhance your skills, boost self-expression, and create interactive pieces that reflect your unique vision and interests.

Step 4: Starting a Coaching Session
Begin your DIY electronics journey with an intake session to establish your personalized plan, setting clear goals for your creative art projects and aligning them with Alleo’s AI coach guidance.

Step 5: Viewing and Managing Goals After the Session
After your coaching session on DIY electronics for art projects, check the Alleo app’s home page to view and manage the goals you discussed, helping you stay on track with your creative journey.
Step 6: Adding events to your calendar or app
Use the calendar and task features in the Alleo app to schedule and track your DIY electronics project milestones, helping you stay organized and motivated as you progress through your creative journey.
Wrapping Up Your DIY Electronics Journey
As we conclude, remember that choosing the right DIY electronics for art projects can be empowering and fun. By assessing your skills and defining clear goals for creative circuit projects, you set yourself up for success.
Next, exploring beginner-friendly kits and versatile microcontrollers like Arduino for artistic installations will make your journey smoother. Incorporating LED art installations and sound-reactive art electronics can elevate your projects visually and audibly.
Finally, using digital templates provides a structured path to follow and customize for your interactive art with electronics.
Don’t let the variety of DIY electronic art supplies overwhelm you. Embrace the creative process and enjoy the satisfaction of completing your microcontroller art projects.
Alleo can be your guide in this journey of DIY electronics for art projects. Take advantage of our free trial to see how we can help with your wearable tech art projects.
Let’s get started and bring your creative visions to life with electronic components for art!